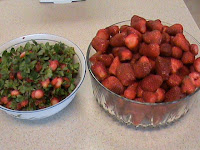
Well, I ended up picking over 5-1/2 pounds of fresh strawberries, so of course I knew these were going to make a great batch of strawberry jam. So that is what I have been up to. I just love home canning. It's so refreshing and relaxing to me.
Homemade Strawberry Jam
4 lbs. strawberries (weighed after they have been hulled)
12 cups sugar *
2 Tblsp. butter (2 pats)
canning jars, seals and bands
First things first, always start with clean sterile jars, bands, seals and other necessary equipment. Using a water bath canner, boil clean jars to sterilize. Place jar funnel, seals, lid magnet and jar lift tongs into a pot of water and let it boil to sterilize them as well.


Using a knife, or my favorite tool, a tomato corer, remove stems from berries. Rinse berries to remove any debris.


Place berries into a large heavy stock pot. Using a pastry cutter, mash your berries. We are making jam, so you will want some semi-chunky pieces.


Add in sugar and stir to mix well.


Over high heat, bring mixture to a boil.

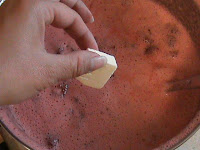
Once mixture is at a full rolling boil, drop in butter pats. Stir to melt.


Reduce heat some what but let it continue boiling until it reaches the gelling stage. Stir pot frequently to prevent sticking. (The gelling stage is when you dip a clean spoon into the mixture and the juices coat the spoon with out running. If juices run off the spoon in a stream, mixture needs to continue boiling. The juices should drip in slow drop form.) At this point, you will need to skim any foam off the top of the jam. Immediately ladle into the hot sterile jars.

Spoon jam into jars. Allow 1/4" head space from top of jars. Place seal and band over jar. Tighten only to fingertip tight. Place jars back into water bath canner and fill with enough water to cover at least 1-2 inches over jar tops. Cover with canner lid and bring to a full rolling boil. After it begins to boil, continue boiling for 15 minutes to process jars.

Once the proper time for processing has elapsed, use your jar lifter to remove jars from the hot water bath. Let jars cool completely. Listen out for that beautiful "ping" sound, as this means your jars are properly sealed.

*The amount of sugar needed will depend on the natural sweetness of your berries. Mine were very sweet so I used 12 cups of sugar for 4 lbs. of berries. The estimate I use on sugar to berry ratio is normally: for every 1 pound. of berries use 2 cups of sugar.
Click HERE for printable recipe


2 comments:
This is very very home making kind of project. I used to make jam and can stuff. Where did I go wrong? Your jars look so lovely.
from Roberta Anne
The Raggedy Girl
Thank you Roberta!
Post a Comment